Lesson 3: How to Change the Eye Color in Pixlr
Changing the eye color in the image is a simple however, there are few tricks. I will highlight them to reduce the incorrect moves. Of course, we have very friendly, helpful tool which is Undo (Ctrl + Z).
1) Open the Pixlr Advance
2) Open an image which has a clear eye color. I will use the image in this URL: http://www.desperatehousecows.com/wp-content/uploads/2012/12/eyes1.jpg
3) If the eye is not so clear try to change the image size or zoom in to the eye. It is not necessary for my picture. You can use the Zoom Tool (Z) or Change the image size which is Lesson 2.
4) After getting a clear eye image use the Lasso tool (L) to surround the eye. It could be hard to do that at first but your hand will get used to it.
5) Go to Edit and Click Copy (Ctrl + C)
6) Open a new layer from the Layer Menu on the right of the screen and middle of the Navigator and History Menu. You can open a new layer by clicking the new layer button near the Trash image (Delete layer)
7) Then Click Paste (Ctrl + V) in the Edit Menu
8) The eye image that you surrounded by Lasso Tool will show up. Then use the Move Tool (V) to put the eye in the exact place as original
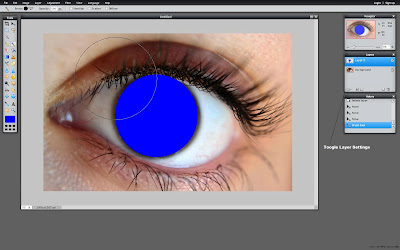
9) After moving the new eye in the original place. Open the Color Selector which is shown in the previous picture. Then choose a color
10) Click on the Brush Tool (B) which is at the Tool Menu and arrange the size of the Brush according to your eye size. You have fit the eye on the brush. You can arrange the size of the brush bu using the gray strip under the Menu. (Top of the Website). Use the Diameter tool in the Brush menu.
11) After getting the exact size of the brush on the eye click once. The Eye will be the color that you choose before.
13) Ta da!!! Green Eye :) :) :)
I changed my mind last minute
Additional image for #12:


I don't understand what step #12 does. Also, why did the pupil of the eye stay black but the rest changed to green? Thanks!
ReplyDeleteHello carla,
DeleteSorry for the late reply. The reason why the pupil is still same is that black is the most dominant color of the world. You cannot make it darker. I also post additional image for #12. Hope it will help :)
Great post! My brown eyes are starting to turn green, it's the strangest thing. Keep up the good work here!
ReplyDeleteHye
ReplyDeleteCan you add tutorial for android app
nice tutorial
ReplyDeleteHey! This is a great tutorial, however, when I tried to make a brown eye blue, it didn't look like a normal eye. It was obvious the original eye color was brown because you could see some brown in the blue. And the blue itself looked like a dark, kind of faded, eye covering thing, not like an actual blue eye. Help?
ReplyDeleteThank you for this tutorial, very helpful!. Greetings from www.photoeditingcompany.com
ReplyDeleteGreat tutorial - but after step 13 you can also use the eraser tool to bring back the catchlights in the eye and get rid of any areas you coloured in error.
ReplyDeleteGreat tutorial. You can also use the eraser tool after step 13 to bring back the catchlights in the eye and get rid of any areas which were coloured in error.
ReplyDeleteHello, Very helpful tutorial . It's really very helpful for world people because most of the people use this app. Please publish a tutorial for Masking service we will be grateful to you !
ReplyDeleteWow it's a professional tutorial and i learn by this post. As a designer i recommend your tutorial. Thanks for sharing
ReplyDeleteclipping path service
Photo retouching especially on the eye is very sensitive. The entire image changes if the perfection is lost. Great article
ReplyDeleteThe tutorial really helped. Appreciated!
ReplyDeleteIts really nice to see all the informative and helpful resources in one place. You have done a great job indeed.
ReplyDeleteclipping path | clipping path service
This is an atrocious app for an computer. By the way this is my personal opinion.
ReplyDeleteThis tutorial on changing eye color in Pixlr is fantastic! The step-by-step instructions are clear and easy to follow, even for beginners. Can't wait to try this out and see the results. Great job!
ReplyDelete