Thursday, May 2, 2013

Lesson 2: Resizing Images

Lesson 2: Resizing Images

Resizing is an important skill for image editing because usually images are not at the same size as you like. There are several ways to do it. I will only show two ways to you.

I. Way


1) Open an image from URL or Computer
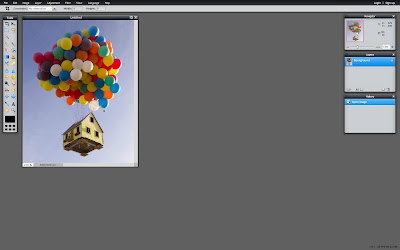
   My picture's URL: http://assets.dornob.com/wp-content/uploads/2011/03/real-floating-balloon-home.jpg

How to browse image
 
2) Click to the Image Button on the upper panel, then press Image Size

Pixlr Image menu
  
3) A board should come out which asks you the Width and Height of the new image and there is a box which helps to change it properly. You may unchecked the box near it but, the quality of the image will break down. The current size of my image is 468x600 and I will change it to 960x1231 (computer suggested the height according to the new width)

Pixlr zoom and Image size

II. Way

 1) Click to Edit button over the black stripe on the upper part of the site. Afterwards, click the Free Transform (Shortcut: CTRL + T)

Pixlr Edit Menu


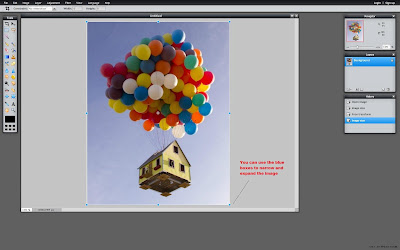
2) Then use the blue boxes to expand and narrow the image size.

Pixlr resizing


3) After narrowing the image size background will be white as a frame. To remove this use technique that you learned in the first lesson.(Crop Tool)
Lesson 1: Basics of Pixlr and Crop

What is Pixlr.com and Lesson 1 (How to Crop an Image)


Pixlr is a website which you can edit your images professionally. It is a cloud cased system and founded in Sweden. There are Mobile app and Computer Version. However it is quite new site, the website popularity increases very sharply.

Link of the site: www.pixlr.com

Pixlr main page

There are 3 different options for editing and the tools are different. We will generally use the Advanced one because you can reach every single tool in that mode.


Pixlr selection


It is like Photoshop and you can do amazing pictures with that. In that position You have 4 options as you see.


1) You can create a new image.

2) You can open an image from your computer

3) You can open an image with using URL.

4) (Requires an account) You can reach your images in the cloud system of Pixlr.


I opened an image from URL; 
https://blogger.googleusercontent.com/img/b/R29vZ2xl/AVvXsEjd8Doyh8ybznSWe51_o9nI_2LMI61rYRuosJOxv4Kb2IIsf9XmEYDvXVOBusmtxzAg68k1mS1DJaMHZsYpT1NCHc6ei4q2TTDz0ZKIhKp4aLFZQEbpADVUj_2F-5aqBOOSYRb31xnHrG4c/s1600/camaro-amarelo10.jpg

pixlr image


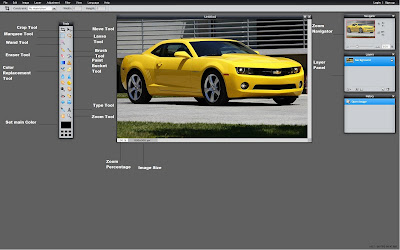
There are many tool on the left side and I made a picture that show basic tools.


Shortcuts for Tools:

  1. Crop Tool: C
  2. Move Tool: V
  3. Marquee Tool: M
  4. Lasso Tool: L
  5. Wand Tool: W
  6. Eraser Tool: E
  7. Brush Tool: B
  8. Color Replacement Tool: No Shortcut
  9. Paint Bucket Tool: G
  10. Type Tool: T
  11. Zoom Tool: Z
You can easily switch tools by using shortcuts.

 Lesson 1 (How to Crop an Image by Pixlr)


So After the Basic Terminology of Pixlr, let's start our first lesson...
We are going to use the crop tool for get rid of the grass.

1) Open the image from URL:

https://blogger.googleusercontent.com/img/b/R29vZ2xl/AVvXsEjd8Doyh8ybznSWe51_o9nI_2LMI61rYRuosJOxv4Kb2IIsf9XmEYDvXVOBusmtxzAg68k1mS1DJaMHZsYpT1NCHc6ei4q2TTDz0ZKIhKp4aLFZQEbpADVUj_2F-5aqBOOSYRb31xnHrG4c/s1600/camaro-amarelo10.jpg

2) Select the Crop Tool 

3) Select the part that you want to keep (not the part you want to remove)

Blue Boxes

4) You can expand or narrow the Crop size by using the Blue Boxes which was shown the previous image.

5) Click somewhere else except the image and click Yes button in the confirm box.

How to crop an image


Yandex.Metrica